99 Explorer 4.0 Timing Chains
#1
 04-29-2010, 11:06 PM


Hello Ford guys. I'm new to the site here. And a bit new to fords. I don't get to work on many. Well.. at least not many like this. Guy brings his truck (explorer) up to the shop and says he wants the timing chain replaced on it. So I'm like ok sure bring it back 7:30 in the morning with the parts. So 7:30 in the moring he brings the truck and its running terrible and he says it would not go over 35 MPH and its extremely under powered. He comlained of a tapping noise in the engine too. I'm thinking well the chain has probably jumped due to excessive slack. I have seen some older 4.0's so i figured it was just like that and a Push-rod engine.
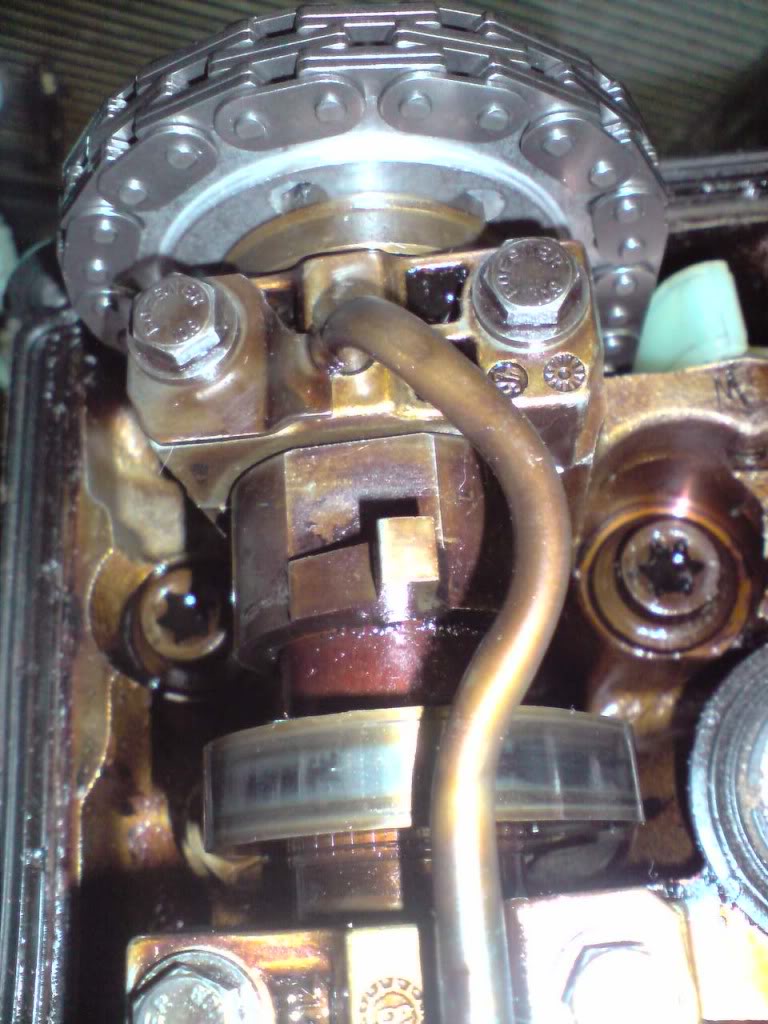
Well at about 9 when i took the timing cover off I couldn't believe what i saw. I saw 3 chains. I was scratching my head and wondering WHAT!? So it was a Sohc engine. I did not have any idea at the time. Looking at the first primary chain the tensioner and guide on the left had broke completely off and was wedged down in the pan under nieth the balance shaft chain. I dug about a hand full of metal and plastic pieces from under niether the Balance shaft. I decided to take the lower oil pan off to get the rest of the pieces out and about another hand full of plastic later. The primary and balance shaft chains had alot of play and no tensioners. The primary one i could not tell if it jumped but it was def about to if not alrealy.
Honestly I don't mess with alot of fords. Its usually Jap cars, chryslers and GMs. So this is new. I've never done a timing chain on this engine before. I was extremely questionable about ford not offering any timing marks on anything. No even th crank or nothing... puzzling to say the least. The customer had already ordered the parts and stuff for it. Appaeartly no part store in town carried the kit and it had to be specail ordered. (Now i know why.)
So I knew a guy that worked a local ford dealer. Called him up and asked him about this timing chain deal. The first thing he told me was "Push it out." Hehe.. jokes. He told me that the that engine had 3 timing chains and a balance shaft chain if it was 4-wheel drive(which it was). He said there is one in the back on the right bank and then one in the front left bank(which i saw). He told me at ford you have to take the motor out to repalce the whole chain set because of that back one. He also told me you have to have a specail Timing tool kit made just for fords to line up all the gears, cam, shafts, chains, ect.
I just dug myself into a job I'll never forget and prob never do again. I've told the customer about it at this point and right now we are deciding on whether to change just the front chain set and leave the back. I'm going to have to remove the Valve covers which I've yet to do because well i thought it was a pushrod engine. I'm wondering if any of you guys have any input or "short cuts" on this deal. Is there anyway to change the rear chain without engine pulling? Can the engines timing be set with the engine in the truck? I'm not sure if theses are interferece engines or not so if it did jump bent valves might be and issue...
Any input would be very helpful. Thanks.
#2
05-19-2010, 07:16 AM

I know you posted this a few weeks ago. But your probably still working on it. Lol.
If you have finished. This is incase you get another or for anyone else.
WARNING: I am not a mechanic. If you stuff this up it's your own fault. It is not the correct way to do this job and inaccurate cam timing is possible.
This is an interference engine be careful.
READ EVERYTHING BEFORE STARTING
First thing: Understand how the timing components are connected and how they work.The crank revolves twice for every one revolution of the cam. All timing gears are held by bolt pressure only. Except the crank gear. Undo the jackshaft sprocket retaining bolt and both cams rotate under valve spring pressure. Undo cam gear retaining bolt and that cam will rotate for same reason. This all results in loss of timing. Timing marks do not matter. The cam position to the crank (TDC) is critical. Chains and gears are not.
Second thing: You can drop the transmission to do the rear cassette. The cassette drops in from the top of the head with the chain and jackshaft sprocket on. It may require a bit of fiddling/wiggling around but it does drop down. Put in the cassette retaining bolt (the one with the torx head ) and tension the jackshaft bolt to specs.(you will work out how to achieve this further down) Put in new jackshaft plug. Trans can now go back on.
Note procedure is the same as engine out.
Some people skip the rear if it is not broken and pray. The front is usually the problem and all updated parts should be fitted. This can be done engine in.
Ok. Engine in or engine out your choice. Start procedure here.
Ensure #1 cylinder is at TDC
Ill skip to timing and valve covers off.
Don't unbolt anything internal yet. Check TDC #1. Check cams are timed correctly or very close.(read further down) Loosen cam bearing caps lightly and in sequence. Remove two cam bearing caps. Cut a piece of plastic coke bottle into 2 small strips, shorter than the distance the bearing caps cover. Bolt the bearing caps down with the plastic between the caps and the cam. Tighten all caps in sequence. Cam is now locked. If not, tighten the caps with the plastic under them a little at a time till it is. Do same for other cam. Unless you get carried away the caps will not break (do not let this happen) the plastic has a lot of give.
It is now safe to remove retaining bolts and all other components. Keep checking for cam movement just to be safe. I removed and torqued all bolts with this method as well as using opposite torque on the cams and wedged a bar through one of the holes in the jackshaft sprocket for added safety. Ensure all parts and chains are fitted and cams are timed. Before torquing up bolts you need to stop the front and rear cassette from moving or timing will be incorrect. I used a piece of wood that fitted between the head space near the screw in external tensioner and the top of the cassette. After all bolts are tightened. You can remove plastic strips. Start reassembly.
How to time cams:
If cam timing is out slightly due to broken cassette lengthening the chain travel or old chain was stretched.With the cam gear retaining bolt loose. Loosen the cam bearing caps with the plastic strips under them, very slightly until the cam can be moved with a shifter or pipe wrench but still needing some force. Remember to tighten them back up for torquing up cam gear bolts and others.
How to align cams:
There are a couple of ways to line up the cams. Use them all for better accuracy.
Cam lobes should face up on #1 and down on #5.
There is a nub that trips the cam sensor on one of the cams this should be facing straight up. There is a flat planed surface next to this, it is also on the other cam at the other end. This surface should be parallel to the head surface and on the same gradient.
There are cut out slots on the ends of each cam. The cut out is offset. Have the smaller part of the cut out facing down. This is hard to see on one of the cams due to it being close to the firewall. Find a rod that will fit nicely into the cutout with enough protrusion on either side so as to be able to measure the distance from the head surface.Make sure these are equal. If they are cams are correctly aligned.
Last edited by DefusedExploder; 05-19-2010 at 08:41 AM. Reason: Warning added
#4
05-19-2010, 11:45 AM
Do not use anything other than PET soda bottle plastic under the cam bearing caps. It is thin enough to not cause breakage and the give in it will help bind the cam and it wont shatter. I have seen a case where someone used different thicker plastic and they cracked their bearing cap. These cannot be replaced. You must buy a complete new/used head with cam and everything if this happens.
#5
04-19-2011, 03:44 PM

DefusedExploder, I know this was posted a while ago but I wanted to personally thank you for you response. I have been trying to find out why, after replacing the timing chains on this motor, I was still getting slack in all three chains at the same time. After reading your post I checked over the cam shaft and noticed that I had the left cam shaft 180 out. Thank you again.


Thread
Thread Starter
Forum
Replies
Last Post